Introduction
Grease traps are essential components in commercial kitchens, designed to intercept FOGs—fats, oils, and greases—before they enter the wastewater disposal system. These traps help prevent clogged drains and potential backups that can lead to costly repairs and health code violations.
Understanding the importance of regular grease trap cleaning is critical for any food service operation.
This Complete Guide for Cleaning Grease Traps in Commercial Kitchens demystifies the often overlooked but crucial task of maintaining a clean and functional grease trap. Readers will learn step-by-step how to clean a grease trap, with practical insights into this necessary kitchen routine.
Additionally, the guide highlights the Benefits of professional grease trap cleaning services. Companies like Pheonix Environmental Solution have the expertise and tools needed to ensure your business follows local regulations and extends the lifespan of your grease trap.
Imagine a busy kitchen without unpleasant smells or unexpected plumbing issues. This guide will show you how to create such an environment. Whether you’re an experienced chef or a kitchen manager, use this comprehensive resource to keep your commercial kitchen clean and efficient.
Understanding Grease Traps in Commercial Kitchens
Grease traps, essential components of any commercial kitchen, are designed to intercept FOGs (fats, oils, and greases) before they enter the wastewater disposal system. The primary purpose of these devices is to:
- Prevent the buildup of FOGs that can lead to blockages and costly plumbing issues.
- Ensure compliance with environmental regulations aimed at minimizing sewer contamination.
Types and Locations of Grease Traps
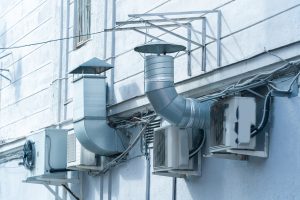
The location of grease traps varies; they can be situated indoors, typically under sinks where dishes are washed, or outdoors. An outdoor grease trap often resembles a small septic tank and is buried near the kitchen facility.
Identifying a grease trap requires recognizing certain features:
1. Indoor Grease Traps:
- Usually smaller in size.
- Located close to the pre-rinse station or dishwasher.
- May have a visible lid or manhole cover for service access.
2. Outdoor Grease Traps:
- Larger capacity to handle greater volumes from multiple sources.
- Often found beneath a manhole or metal cover marked “Grease” or “Grease Trap.”
By understanding these characteristics, one can readily pinpoint the identification of grease traps within a commercial setting. Proper knowledge of their location and function facilitates effective maintenance and cleaning strategies, ensuring a well-operated kitchen free from unwanted plumbing disasters.
The Cleaning Process: Step-by-Step Guide
Cleaning a commercial kitchen’s grease trap is essential for maintaining a hygienic, efficient, and safe environment. This guide provides an in-depth look at the step-by-step cleaning process, ensuring your establishment adheres to health standards and operates without plumbing disruptions.
Equipment Required for Cleaning
Before diving into the cleaning steps, ensure you have the following equipment on hand:
- Rubber gloves to protect your hands from grease and debris
- Nose plug or gas mask to avoid inhaling unpleasant odors
- Protective coveralls to keep your clothes clean
- Crowbar or wrench for opening the grease trap lid
- Scraper to remove accumulated FOGs (fats, oils, and greases)
- Shop vacuum for extracting liquids and small solids from the trap
- Steel pot scrubber, dish soap, and tepid water for scrubbing surfaces
Step 1: Locating the Grease Trap
Identifying the correct location of your grease trap is crucial before starting the cleaning process. Here’s how you can locate it:
Indoor Grease Traps:
- Typically found beneath sinks where they are easily accessible.
- Look for a small manhole cover or septic tank design within close proximity to kitchen appliances that use water.
Outdoor Grease Traps:
- Usually located outside, buried underground near the kitchen.
- Identify them by searching for larger manhole covers that might be labeled or indicated on building plans.
Once you’ve pinpointed where your grease trap is located, you’re ready to proceed with determining its size and capacity, which will guide you in how to approach its cleaning.
Step 2: Determining the Size of the Grease Trap
Before we start cleaning, it’s important to know how big our grease trap is. This step is crucial because it tells us what equipment we need to use, so we’re ready for the job.
Here’s how to measure your grease trap correctly:
- Find the Lid: Make sure you know where the lid of your grease trap is, just like we talked about in step one.
- Measure the Size: Use a tape measure to find out how long, wide, and deep your grease trap is. If you have a round trap, measure the diameter and depth instead.
- Calculate the Volume: Multiply these measurements (length x width x depth) to find the volume. For round traps, use this formula: Volume = π x radius² x depth.
- Check the Capacity Label: Some grease traps have a label that shows how much they can hold. Compare your calculations with this label to make sure they match.
Equipment You’ll Need for Cleaning
Now that you know how big your grease trap is, it’s time to gather the right cleaning tools:
- Small traps can usually be cleaned using basic equipment like scoops and buckets.
- Larger systems often need specialized machines such as a shop vacuum.
Protective Gear
Safety is extremely important during this process. Always wear rubber gloves, protective coveralls, and a nose plug or gas mask to protect yourself from dangerous gases and bacteria.
Understanding the Entire Cleaning Process
It’s helpful to know what each step involves before we get started:
- Finding the grease trap
- Figuring out its size
- Getting rid of the waste
- Scrubbing all the parts
- Doing a final rinse and flow test
By measuring accurately and using the right tools, you can make sure that every part of the cleaning process is done safely and efficiently. Remember that knowing the size of your grease trap also affects how you dispose of the waste, which is just as important for keeping your commercial kitchen running smoothly.
Step 3: Performing the Actual Cleaning Process
Managing a commercial kitchen well means keeping the grease trap clean and functional. This crucial cleaning process not only keeps your plumbing system in good shape but also follows health and environmental rules.
Before you start, it’s important to know how it all works. From finding the grease trap to getting rid of waste, each step is important for a clean and efficient system.
Preparing for Cleaning
Safety First: Protect yourself with rubber gloves, a nose plug or gas mask, and protective coveralls to stay safe from the smelly and potentially dangerous materials you’ll be dealing with.
Tools Required: Get the necessary tools like a crowbar or wrench to open the trap, a scraper to remove residue, and a shop vacuum to suck up liquids and solids.
Cleaning Overview
Here’s an overview of what needs to be done from start to finish:
Initial Inspection: Check around the grease trap for any leaks or damage.
Removing the Cover: Use a crowbar or wrench to pry open the cover.
Getting Rid of FOGs: Carefully scoop out fats, oils, and greases (FOGs) that have built up on top.
Vacuuming Everything: Use your shop vacuum to remove both floating materials and settled solids.
Scraping and Cleaning: Thoroughly scrape baffles, sides, and lid to make sure all grease is gone.
Flushing: Scrub down all surfaces with a steel pot scrubber, dish soap, and warm water before flushing with clean water.
Detailed Steps
Here are the specific actions you’ll need to take:
Remove The Cover: Start by carefully prying off the lid of the grease trap with your crowbar or wrench. Be careful as gases trapped inside may escape suddenly.
Scooping Out FOGs: Using a small scoop or bucket, systematically remove the layer of FOGs that have risen to the top of the grease trap.
Shop Vacuum Use: Use your shop vacuum to suck out remaining water and smaller particles that can’t be easily scooped out.
Scraping Baffles and Surfaces: Pay close attention to detail here; use your scraper on baffles, walls, and other surfaces inside the trap to get rid of any clinging grease residues.
Final Scrubbing: With a steel pot scrubber and mild dish soap in warm water, give all interior surfaces an extra scrub. This step makes sure no leftover FOGs are left behind which could cause problems later on.
During every step of this process, remember that efficiency in action goes hand-in-hand with meticulous attention to detail.
Armed with these steps and key considerations, you’re ready to effectively clean your commercial kitchen’s grease trap. This is important not just for smooth operations but also for meeting environmental health standards.
Step 4: Flushing and Finalizing
Once the grease, oils, and solids have been carefully removed and the trap’s parts have been cleaned, it’s time to complete the last step of the cleaning process: Flushing with clean water. This step is crucial to make sure any remaining dirt is washed away and the system is working properly.
Why Flushing is Important
Prevents Future Blockages: Flushing removes any leftover waste, lowering the chances of future clogs.
Ensures Cleanliness: It helps get rid of smells and keeps the trap fresh, creating a clean environment.
Confirms Clear Pathways: Clean water flowing smoothly through the system shows that there are no blockages left.
Equipment Needed for Cleaning
Make sure you have these items ready:
- Protective gloves and eyewear
- A source of clean water (like a hose or bucket)
- A container to catch overflow if needed
The Flushing Process
- Slowly pour clean water into the grease trap.
- Watch the water level to check if it’s draining correctly.
- If needed, repeat this a few times until the water runs clear.
Testing Water Flow for Blockages
To confirm that your cleaning has worked and there are no blockages left:
- Let a gallon of clean water from the nearest kitchen sink flow through the grease trap.
- Keep an eye on how fast and smoothly this water drains through the system.
- If there’s no backup and water flows freely, your grease trap is clear.
By following these steps carefully and using the right equipment, commercial kitchens can effectively maintain their grease traps, reducing the risk of plumbing problems and staying compliant with health regulations.
In addition, it’s equally important to dispose of grease trap waste properly as part of running an environmentally-friendly operation.
Proper Disposal of Grease Trap Waste
Disposing of waste from grease traps is a critical aspect of kitchen maintenance that requires careful attention due to its potential environmental ramifications. The fats, oils, and greases (FOGs) collected in grease traps are not only unsightly but also harmful if released into the environment improperly.
Methods for Small Quantities of FOGs:
- Solidification: This involves mixing FOGs with absorbent materials such as kitty litter to solidify the waste. Once solidified, it can then be placed in double-lined garbage bags and disposed of in local dumpsters designated for such waste.
- Service Providers: Some waste management companies offer specialized disposal services for small amounts of FOGs, ensuring that these are processed in accordance with local regulations.
Handling Large Quantities of Grease Trap Waste:
- Professional Services: For substantial volumes of waste typically found in commercial kitchens, partnering with professional grease trap cleaning companies like Pheonix Environmental Solution is advisable. These companies are equipped to handle larger quantities responsibly and understand the complexities associated with proper waste treatment and disposal.
- Recycling Programs: Large volumes of FOGs can sometimes be collected and recycled for future use. Licensed EPA recyclers like Pheonix Environmental Solution offer programs where these wastes are converted into valuable resources, thereby minimizing environmental impact while adhering to sustainability practices.
By employing appropriate disposal methods for grease trap waste, commercial kitchens contribute to a cleaner, safer environment. It’s essential that these practices are executed consistently following each cleaning cycle to avoid negative consequences on local ecosystems and adhere to health and safety standards.
Recommended Cleaning Frequency and Cost
Cleaning Frequency: Maintain Peak Efficiency
Regular maintenance is vital for the smooth operation of grease traps in commercial kitchens. To prevent backups and avoid potentially costly repairs, it’s suggested that grease trap cleaning should occur every 4-6 weeks. This routine servicing ensures that FOGs (fats, oils, and greases) do not reach levels that could impede kitchen operations or cause environmental damage.
Innovative Solutions: Bacteria Additives
- Bacteria additives serve as a proactive measure to breakdown grease between cleanings.
- These additives contain microorganisms that digest FOGs, thus reducing the amount of waste.
- When selecting bacteria additives, careful consideration is essential to choose products compatible with your system and local regulations.
Cost of Professional Cleaning Services: A Worthwhile Investment
The cost for professional cleaning services varies widely:
- Factors influencing price include the size of the grease trap and the degree of grease accumulation.
- Small traps may only require a modest investment starting around $115.
- Larger systems or those with significant buildup might see costs up to $1040 or more.
Hiring experienced professionals not only ensures a thorough job but also aligns with best practices for maintenance and compliance with local ordinances.
They possess the expertise necessary to deal with varying degrees of complexity associated with different sizes and conditions of grease traps.
Benefits of Hiring Professional Grease Trap Cleaning Services
Outsourcing grease trap maintenance to seasoned experts like Pheonix Environmental Solution unlocks a suite of benefits of professional cleaning that surpasses what an in-house team can provide. The nuanced demands of this task necessitate a level of expertise and experience which ensures that the job is done right the first time, saving time and resources in the long run.
1. Specialized Knowledge and Equipment
Professionals come equipped with not only the right tools but also the understanding of how to use them effectively. They employ advanced equipment and techniques tailored for grease traps of all sizes, ensuring a comprehensive clean that extends the lifespan of your installation.
2. Thorough and Efficient Cleaning
With experts at work, every corner of your grease trap receives attention. The meticulous process involves:
- Removing FOGs
- Scrubbing away residual waste
- Performing a thorough inspection to pinpoint any potential issues before they escalate.
3. Compliance Assurance
Navigating regulatory requirements can be challenging. Reputable companies like Pheonix Environmental Solution are well-acquainted with local regulations governing waste disposal, helping your business avoid costly fines and remain in good standing with environmental standards.
4. Risk Mitigation
Experienced professionals recognize hazards associated with grease trap cleaning, such as exposure to harmful gases or bacteria. They are trained to mitigate these risks, ensuring safety for all involved.
By entrusting this essential task to specialists, commercial kitchens can focus on what they do best: delivering exceptional culinary experiences to their patrons. With the confidence that their grease management is in capable hands, businesses can operate smoothly without interruption due to plumbing emergencies or non-compliance setbacks.
Conclusion
Grease traps are the silent sentinels of your commercial kitchen, safeguarding plumbing systems and local waterways from the damaging effects of FOGs. This guide has equipped you with the knowledge to tackle grease trap maintenance confidently. Remember, regular cleaning is not just a recommendation—it is a necessity for operational efficiency and environmental protection.
Embrace the practices shared in this Complete Guide for Cleaning Grease Traps in Commercial Kitchens and consider integrating them into your routine maintenance schedule. Should the task seem daunting or if time constraints arise, do not hesitate to enlist professional services like those offered by Pheonix Environmental Solution. Their expertise ensures that your grease traps function optimally, comply with regulations, and contribute to a healthier environment.